
1. Enable PHP for LDAP authentication Windows
- Copy the libeay32.dll , ssleay32.dll files from under the infocaptor/server/php directory and copy them in the windows/system32 directory
- Edit the php.ini file and enable the php_ldap.dll extension
- Restart your webserver
Linux
- install php-ldap
- Edit php.ini and enable php_ldap.so extension
- restart your webserver
2. InfoCaptor settings for LDAP Once you have done the php related settings you can proceed to add the ldap settings to the infocaptor config file.
For LDAP, the settings are stored in the infocaptor_config.php file located under system folder system/infocaptor_config.php
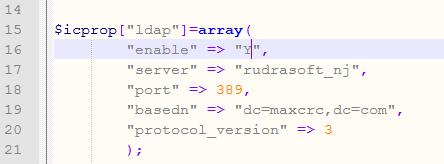
set the enable flag to ‘Y’ and then provide the LDAP server, port and basedn settings.
The default protocol version is 3 based on open ldap but you need to use the appropriate version for your ldap. When you set LDAP, the authentication is done at your LDAP server. The user still needs to be existing in InfoCaptor application.
How to register users when LDAP is on
You can let the users register themselves by giving them the register URL

NOTE: (Very important) If LDAP is on and you let the users register themselves then instruct your users to use their default LDAP user_id when they signup.
The password they use when registering using the above URL is not used for authentication when LDAP is on.
Alternatively, the “admin” user can use the bulk user addition script as described below.
How to add bulk users to the InfoCaptor application
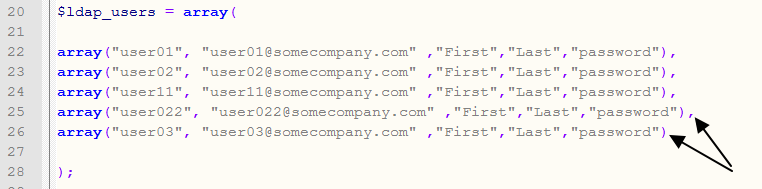
You can enter all the LDAP users in the file located at ../../infocaptor/dash/system/bulk_user_list.php
The structure is very simple $ldap_users = array( array(“user01”, “user01@somecompany.com” ,”First”,”Last”,”password”),array(“user02”, “user02@somecompany.com” ,”First”,”Last”,”password”),array(“user11”, “user11@somecompany.com” ,”First”,”Last”,”password”),array(“user022”, “user022@somecompany.com” ,”First”,”Last”,”password”),array(“user03”, “user03@somecompany.com” ,”First”,”Last”,”password”) );
Here are some rules how to enter entries for this bulk user list.
//each row represent the user record,
//Provide username, email, first name, last name, password
//username should be unique
//email should be unique
//the password is raw text and it is encrypted when registered with infocaptor.
Again, if LDAP is on then this password is just a dummy value
//if the record already exists in infocaptor it will be skipped
//your license restricts the amount of users you can add to infocaptor
//make sure the last row in the array does not have the ending comma.
Run the bulk user addition script –
NOTE: only the user “admin” can run this script
Once you add the entries to the system/bulk_user_list.php, you can invoke the add_bulk_users.php script that will take each entry and add it to the system.
The script calls internal APIs to set the groups, categories and create proper directory structure for each user so it might take a while to process if you have a huge list of users. You can break up the list into multiple runs if it takes long.
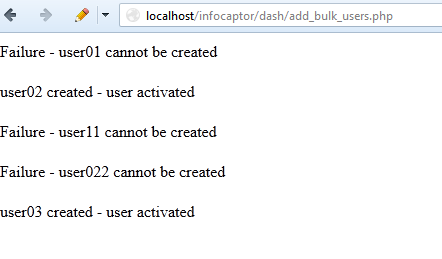
Failure of adding a user could mean multiple things. Either the username, email address provided are not unique which means the user withthat username or email is already added to the system. In case of error, check the log files in the log directory.